
Most island regrets trace back to decisions made before the stone was ever ordered: an island that crowds the aisle, stools with nowhere for knees to go, an overhang that isn’t supported, or a seam that lands right where the eye falls. This kitchen island layout guide is built to prevent those. It covers kitchen island countertops in Columbus, OH in the order the decisions actually come up: footprint and clearances, work zones, seating, material, thickness, edges, and slab and seam planning.
The short answer to “how do I plan an island?” is to start with the aisle space around it, not the island itself. Size the island to what the room can spare, then fit seating, then choose a material and edge to match. Kitchens in the Columbus area range from older houses to newer open-plan builds, so measure your own floor plan instead of copying a photo.
Start With the Footprint: Island Size and Clearances
Commonly cited standard kitchen island dimensions run roughly 40 to 84 inches long, 24 to 36 inches deep, and 36 inches high, with 42 inches for bar-height seating. A 24 by 48 inch island is about the smallest that’s practical, and it works for prep and storage but not seating. Those are typical ranges, not rules. What decides the size is the space around it.
The National Kitchen & Bath Association (NKBA) Kitchen Planning Guidelines set the clearances most designers work from:
| Planning point | NKBA guideline |
| Work aisle, one cook | At least 42 inches |
| Work aisle, more than one cook | At least 48 inches |
| Walkway | At least 36 inches |
| Seat with no traffic behind it | At least 32 inches to the nearest obstruction |
| Seat with traffic behind it | At least 44 inches |
Add the depth of appliances that stick out past the counter, and picture every oven and dishwasher door open at once. If two people can’t pass comfortably, the better move is a smaller island, a peninsula, or no island at all. A kitchen island size and layout that fits on paper but pinches in daily use is the most common mistake in how to plan a kitchen island.
Layout: Work Triangle, Sink, and Cooktop
The NKBA’s work triangle guidance keeps the three legs between the sink, cooktop, and refrigerator at no more than 26 feet combined, with each leg between 4 and 9 feet. An island can sit inside that triangle, but no leg should be cut by it by more than 12 inches. Put differently, the island shouldn’t block the path between your main work centers.
Where you put the sink or cooktop changes the prep space you get. The NKBA suggests at least 24 inches of landing space on one side of a sink and 18 inches on the other, and at least 12 and 15 inches beside a cooktop. If the cooktop is in the island, the counter should extend at least 9 inches behind it. Keep seating away from the cooking side, and plan ventilation and any electrical needs with an electrician early, because local code decides what’s required.
Seating: How Much Room Each Stool Needs
Seating takes more space than most people expect. The NKBA allows 24 inches of width per seated person, and the knee space depends on counter height:
| Counter height | Knee space depth |
| 30 inches (table height) | 18 inches |
| 36 inches (counter height) | 15 inches |
| 42 inches (bar height) | 12 inches |
For a kitchen island with seating for three, that’s at least 72 inches of length along the seating side, plus the clearance behind the stools. Adding seats is easy to do on paper and hard to undo in stone, so decide the count first. If the same island serves cooks and seated guests, a two-level design can help: the NKBA’s accessibility guidance suggests offering work surfaces at more than one height, such as 28 to 36 inches and 36 to 45 inches.
Rounded or clipped corners matter here too. The NKBA recommends them in place of sharp edges on all counters, which is a good reason to think about the edge profile now, not at the end.
Stone or Engineered Quartz for an Island?
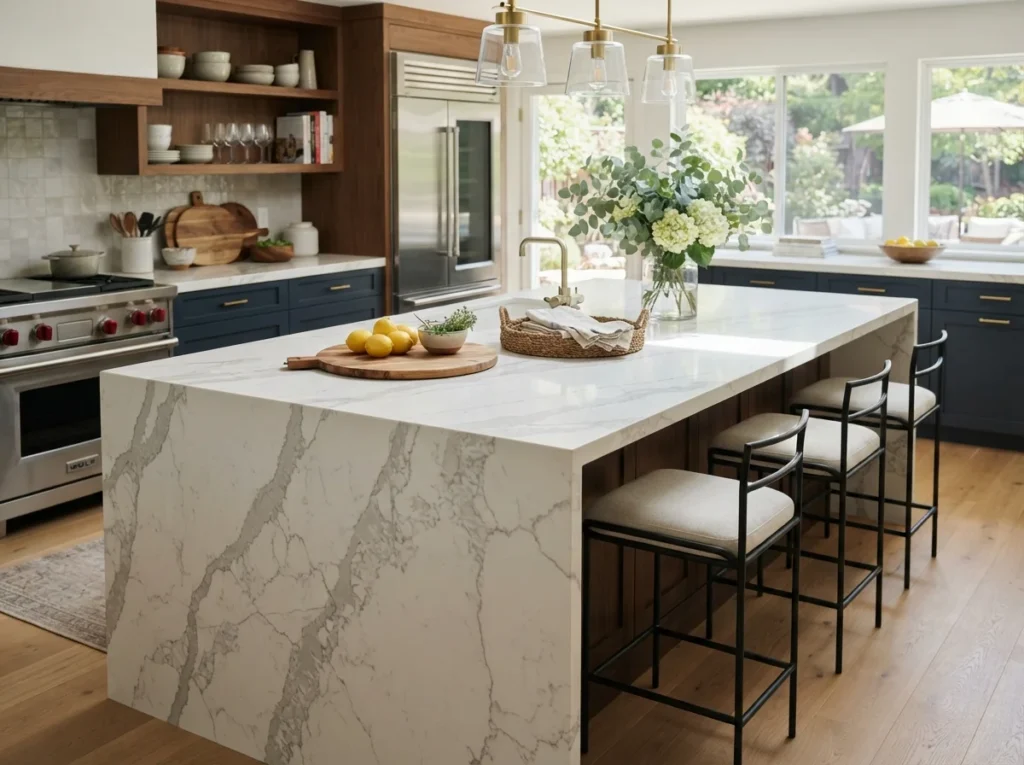
Islands take more abuse than most counters because they’re used from every side: homework, prep, serving, and the occasional dropped pot. Natural stone and engineered quartz are both common choices (granite behaves much like other dense stone). Stone resists heat and scratches well but may need sealing, while engineered quartz doesn’t need sealing but can be marked by high heat. Marble is beautiful and softer, so it etches and chips more easily, which matters on an island’s exposed edges.
If you’re still deciding, this comparison of how to choose kitchen countertop materials sets the options side by side. For an island, ask two extra questions: how will the edge hold up, and does the pattern look good from both sides?
Thickness and Overhang Support
Island countertop thickness is usually 2 cm or 3 cm. A 3 cm slab is stiffer and gives a thicker look on the edge without extra build-up. A 2 cm slab is lighter and less costly but needs continuous support underneath. Industry guidance commonly calls for a plywood subtop under 2 cm stone, and some fabricators build up the edge to look thicker.
The overhang is where thickness really matters. Published limits vary by stone and brand, but about 10 to 12 inches of unsupported overhang is a common figure for 3 cm granite and quartz, and less for marble. Compare that with the seating table: knee space of 15 inches at counter height or 18 inches at table height goes past that limit. That means hidden steel brackets, corbels, or a support leg, and the brackets need to be planned before the cabinets are finished. Always check the manufacturer’s specification for your slab.
Edge Styles for Island Countertops
The edge is the part of the island people touch most. Among kitchen island countertop ideas, these are the common edge profile choices:
- Eased edge: the top corner is only slightly softened. It’s simple and usually the baseline.
- Beveled edge: an angled cut across the top corner for a crisper line.
- Bullnose edge: fully rounded, which spreads impact and is forgiving on seating sides.
- Mitered edge: two pieces joined at an angle so the edge looks thick and the pattern wraps around the corner.
- Waterfall: the slab continues down the side of the island, usually mitered, and shows off dramatic veining.
Sharp corners and deeply undercut profiles are the most chip-prone, particularly on softer stone. Engineered quartz can be shaped into most profiles. On a waterfall, the inside miter corner is the most vulnerable spot, so ask how it will be reinforced. Complex edges and waterfall ends also add fabrication time and material, which is why they raise the price.
Slab Size and Seams
A standard quartz slab is roughly 56 by 120 inches, and jumbo slabs reach about 65 by 130 inches. Natural stone slabs are commonly in a similar range. Because slab size varies by material and supplier, ask for the exact dimensions of the slab you’re choosing.
A seam becomes likely when an island runs longer than the slab or is long and wide at once. As a rough rule, plan for a seam once the island passes about 55 inches in any direction. Good seam placement lands over cabinet support, often near a sink cutout, and avoids open overhangs and cutout corners. A seam that runs front to back is usually less noticeable than one running side to side. Pattern and veining continue across a seam only if the fabricator plans the layout, so ask to see a dimensioned drawing before cutting.
This is where custom countertop fabrication earns its keep. Buckeye Rock Tops’ custom countertop fabrication covers granite, quartz, and marble, and the company’s page says seams are joined and sealed and the space is checked for style and dimensions first.
From Plan to Installation
Templating happens after the base cabinets are installed, level, and secured, so the island’s cabinets and the support under any overhang should be finalized before the stone is measured. Material ordering and fabrication then run before installation day. The countertop installation timeline for Columbus homes walks through each stage, so you can see where an island fits into a larger kitchen renovation planning schedule.
Bring these to a fabricator consultation:
- A dimensioned floor plan with aisle widths marked
- The seating count and counter height
- Sink, cooktop, and outlet locations
- Preferred material, thickness, and edge
- A request for a seam drawing and the overhang support plan
Buckeye Rock Tops fabricates and installs granite, quartz, and marble countertops in Central Ohio, so it’s one option when you’re comparing fabricators.
Island Planning Questions Homeowners Ask
Can a small kitchen have an island?
Only if the aisles still meet the clearances above. When they don’t, a peninsula or a rolling cart gives you extra counter without blocking traffic.
Should the island match the other countertops?
Not necessarily. A contrasting material or color can make the island a focal point, as long as the two tops share a tone or undertone with the cabinets and floor.
Is a waterfall edge worth it?
It suits slabs with strong veining and kitchens where the island is the centerpiece. It adds material, cutting, and fitting, so weigh it against simpler edges.
Planning Your Kitchen Island Countertop
The best island plans start with clearances, then seating, then the details of stone, thickness, edge, and seams. Get those in order and the countertop itself becomes the easy part. If you’re planning a kitchen island countertop in the Columbus area, contact us or call (380) 266-7082.